Monday, November 22, 2010

Coho Salmon en Papillote with vegetables, cranberries, and Ricotta Salata (That's "in Parchment" if you don't speak French)

Yeah, I know, It's been a while since I blogged.  I have been busy, and the few major dishes I did try out, I forgot to photograph, and how many blogs do we need about Boef Bourginion and Osso Bucco anyway?  Back to it this week though, and since this Thursday is Thanksgiving and the start of all the rich foods of the holidays, I though I'd kick the week off with some nice fish.  So off to Whole Foods, where I was faced with their new color coded system telling me which fish were in danger of overfishing and which fish are sustainable.  I ended up with Coho Salmon from Alaska, which the sign assured me was being fished responsibly.   I last did this with Lemon Sole, which the new system told me was in trouble.
One technique I have picked up recently for cooking fish is to cook it in parchment, or "en papillote" as it were.  The fish steams inside the paper, and unlike aluminum foil, you can serve it in the paper and the paper does not add off flavors with any acidic ingredients.  for this recipe, which I believe is original, you will need the following, in whatever quantities you desire, in addition to Coho Salmon Filets, around 1/3 to 1/2 pound each.  Preheat your oven to 400 degrees when you start assembling.
-New potatoes, sliced very thin 

-Carrots, julienned

-Fresh Asparagus spears, with the tough ends broken off.  (The best way to do this is to hold the asparagus spear about at the middle, and bend the thick end until it breaks off.  It will break where it should)
-Fresh Leeks, cut as shown.  Peel the outside layer, cut off the end, split the leek from where it turns white to the end, and split again to make 4 quarters.  Rinse the split leek well before slicing into 1/4 to 1/2 inch slices. Shown is one large leek.
Italian Flat Leaf Parsley, roughly chopped

-Fresh rosemary and thyme
-Fresh, uncooked cranberries


You will also need 
-about 1/4 cup white wine of choice per filet
-about two Tbsp crumbled Ricotta Salata per filet
-Extra virgin olive oil
-kosher salt and fresh ground pepper
Start by cutting a large paper heart out of the baking parchment.  C'mon, you remember this from elementary school, right?  Drizzle or brush about 1 tbsp of the olive oil on one half of the heart.
Arrange a mound of the potato slices as a base.
Place the filet on the potatoes and season as desired with the salt and pepper.
Arrange your vegetables in the order you desire.  Here I started with the carrots, added the parsley and asparagus...
then added the leeks, cranberries and herbs, followed by a nice sprinkle of white wine, about a 1/4 cup (I used some cheap Prosecco from Trader Joe's. I love a good a 5 dollar "champagne"!!).
Now it's ready to fold.  Starting at the top of the heart, roll the bottom over the top, and work your way around, being very careful to press hard and twist where you can to make sure it stays shut.  At the bottom, twist the end as shown.
Place in your 400 degree oven and bake for 20 minutes plus or minus a minute.  Remove and place on serving plate...
Cut the paper open in front of your dining guests and bask in the oohs and ahhs as the steam rises from the perfectly cooked fish and veggies.
Add 1 or two Tbsp of the crumbled ricotta salata (dried, salted ricotta) to the top and enjoy.  The sweetness of the wine and the ricotta salata, not to mention the carrots and leeks, counters the tartness of the cranberries and make this dish a winner!

Sunday, October 24, 2010

BBQ Chicken... Time is growing short.

Few things mean summer to me like Barbecuing chicken over a real charcoal fire... in many ways!  I spent the summers of my youthful prime working for a small amusement/picnic park in the Philadelphia Suburbs.  My main job was running the Chicken and corn pavilion, where we would turn out up to 5,000 pieces of chicken and corn on any given Saturday or Sunday.  My partner Steve and I have estimated that we probably cooked around 3 tons of chicken in the years we worked at "The Park"
The park was West Point Park, in West Point, PA, a small village about 20 miles west of Philadelphia.  The park is no longer in existence, and the site is now primarily the back lots of Merck & Co. (the pharmaceutical giant), and a few overpriced cookie cutter "fine" homes.
West Point Park was originally built in 1868 as a "Trolley Park" designed to give people a place to ride the trolleys on a weekend.  My friend Steve (pictured) and I worked there in the last years of the park, in the mid to late 1980s.
The largest part of the park's business was hosting company and family picnics.  The highlight of those picnics was the BBQ chicken.  The key to the chicken was the baste, which we sprayed on the chicken with brass sliding pump sprayers, like the one at left.
One person would carry the stainless steel bucket of sauce, stirring constantly with the end of the hose, while the other would pump the spray on the chicken.  With two full pits of chicken at full cook this was a very intense operation.  At left is the first spray, on only 3/4 of the pits, before the fire got really hot.  At peak heat, about ten minutes from when this picture was taken, you couldn't see the far end of the pits through the smoke.  you would take a deep breath and dive in, with fire masks on, frequently spewing fire from the end of the spray nozzle.  OSHA would have had a field day, to say the least! The baste itself was a simple concoction of one gallon of white vinegar to one pound of butter, with salt and pepper.  It had to be stirred constantly while spraying, or the sauce would separate.   We would lay out the racks of chicken bone side down as soon as the flames subsided and the coals were white.  We would then spray and flip the racks, browning the skins with the early peak heat of the coals.  This was followed in about 5 minutes with another spray/flip to put the bone side down again.  After this initial process, we would leave them on their backs for about 10-15 minutes, and then spray/flip at 10 minute intervals, until the chicken was golden brown, at about 45 minutes total.
The chicken was delicious and juicy, with the vinegar sealing in the juices, and the butter creating the crispy golden brown skin.  Over the years I have created many variations of this baste using different herbs and spices, and last year I picked up a tip from upstate New York, where they have a variation of the classic baste called State Fair Chicken which adds an egg to the mix and uses oil instead of butter.  Of course the simplest way to achieve similar results is to use Italian salad dressing, straight from the bottle, but that's too simple for me, and I have been using the following mixture, more or less, to great success.

Ingredients:
3 Tbsp unsalted butter, melted.
2 Tbsp Extra Virgin Olive Oil
1 large egg
1/2 cup Vinegar (White, or Cider, or Red Wine, or White Wine... your choice)
2 cloves garlic (1 Tbsp), smashed and minced
Kosher Salt to taste
Fresh ground  black pepper to taste
Any or all of the following, to taste
Rosemary, Thyme, Parsley, Marjoram, Minced Dried Onion

You can really use your imagination, if you start with the butter or oil and vinegar mix, you will get good results.  The egg really adds a nice glaze too.
 The trick with cooking chicken on a charcoal grill is heat control.  You must brown the skin before you lose your peak heat.  So while on a gas grill I will usually cook at a low temperature, leaving the chicken on it's back for most of the cooking time, on charcoal I find the best success moving and flipping and basting frequently.  The easiest part to cook is thighs.  The kids love them the best, and it is hard to dry them out.  Breasts are the trickiest.  Here I am cooking two breast halves, and 7 thighs. I cook the chicken until the juices run clear, and the meat is falling away from the bone.  The absolute best cut for BBQ is 1/2 chickens, as the connected leg segments help protect the breast, keeping it nice and juicy!
 At left is the finished product.  Unlike at the park, I usually like to finish off with some red BBQ sauce of my choice.  Here I used Maul's, which is a great sauce Erika's Stepfather Jim buys by the case via the internet, and which I brought back from our summer vacation.  When this is gone I will go back to my latest favorite, Stubbs.  I could make my own, but with all the great sauces out there to try, why bother?

Saturday, October 23, 2010

Chimichurri Eggplant Dip

Just a quick entry.  I think this may be a complete original.  I had two small eggplants, not enough to use as a main entree, so I though I might try to make some baba ganoush.  I always enjoy this rich, garlicky eggplant dip, and like saying "baba ganoush" even more!  Lo and behold, when I realized I had no tahini, and that making said tahini would take a day and a lot of labor, I looked for an alternative.  After a little research, I found a couple of roasted eggplant dip recipes, but didn't have all the ingredients for any of them.  So I took what I had and improvised.
Ingredients:
2 small eggplants
1 small head of garlic
3 Tbsp Extra Virgin Olive Oil
a small bunch of flat leaf Italian parsley, chopped
juice of 1 small lemon
1 tsp cumin
1 tsp smoked paprika
1/2 tsp sesame seeds
salt
pepper

Preheat your oven to 400 degrees.
Clean the outside of the eggplants well, pierce multiple times with a fork, rub with olive oil, or spray with olive oil cooking spray, and roast with the ball of garlic until very soft, about 20 minutes.
After roasting, squeeze the garlic out of the skins into a blender
Peel the eggplant, cut into pieces and also put into the blender.
Roughly chop the parsley and add to the blender, with the rest of the ingredients.
Pulse blend until ingredients are incorporated, then blend till smooth and serve with pita chips.
Delicious!!

Sunday, October 3, 2010

Roasted Corn Pudding in Acorn Squash

Autumn is upon us in full swing now.  you can taste it in the air, and on the plate! Our first season with the CSA Organic Farm is still filling our kitchen with fresh produce.  More often than not the problem is losing track of what produce we have to work with.  I need to come up with a chart or something that will show me what we have in stock.  One thing that infuriates me is finding produce that has gone bad because I forgot we had it in the fridge!  It almost happened to some Bok Choy, but I discovered it in time and sautéed it up quick with some garlic, olive oil, white wine and soy sauce!  Saved!  Now I still need to figure out what to do with two Napa Cabbages before they go bad!  On the other hand, Erika and I got one lonely Acorn Squash from the CSA and wondered if it was one too many, as I didn't know what to do with it.
It seemed as though most treatments for Acorn Squash involve baking it with brown sugar.  While that sounded OK, It didn't truly excite, and with only one squash, I figured there wasn't enough to work with for a soup.  That's when I came across the website 101 Cookbooks, hosted by Heidi Swanson.  She had Acorn Squash filled with a corn pudding and covered with cheddar cheese, and this seemed like a much better direction to me!  I varied slightly from Heidi, who diverged from a recipe by Karen Hubert Allison in her book The Vegetarian Compass. 

Ingredients:
One Acorn Squash, Split down the middle, and seeded.
Olive Oil Cooking Spray
Corn kernels from one medium ear, uncooked (about 1/2 to 1 cup).
1/8 cup creme fraiche
1/8 cup skim milk
1/4 tsp fennel seed, crushed
1/2 tsp parsley flakes
2 eggs plus one egg white
shredded cheddar cheese.
Now here is where I usually put in my disclaimer about ingredients.  This time is no exception.  The original recipe called for 1 cup milk, I had creme fraiche and skim milk, so I used half each...  A lot of my experimentation is simply based on what I find available and think will work at the time. The recipe called for anise seed, I had fennel which has an anise taste... the recipe called for one egg plus two whites, I didn't want to save a yolk...  Given the choice I would use white cheddar instead of yellow, purely for appearance. 

First spray the split, cleaned squash halves with the olive oil spray, sprinkle with kosher salt and fresh ground pepper and put them in a 375 degree oven for about 40 minutes.  
Mix the other ingredients well in a bowl, except for the cheese.  
At 40 minutes, remove the squash from the oven, sprinkle a little cheese on it, then fill the cavity 3/4 with the pudding mixture. The amount of filling described in the ingredients will probably be way too much for the squash to hold, but not way too much for you to want to eat!  This explains the ramekin seen next to the squash in the above photo. After filling the two halves of squash (way past 3/4 by the way), I still filled 2 ramekins. 
Bake for another 1/2 hour to 40 minutes, until the pudding is set.  You will be able to tell when you move the baking sheet!  
When they are completely cooked, sprinkle the cheese on the top and carefully finish under the broiler for a minute or so...  don't let them burn... KEEP WATCHING!  
When they came out of the oven, the puddings in the ramekins were twice as tall as in the photo, they fell as they cooled. 
This came out better than expected!  The corn pudding took me back to holiday dinners of my youth, with the creme fraiche adding a slightly more refined tang.  The corn pudding in the ramekin comes in handy when you run out of it in the squash!  A nice warming dish on a cold rainy day!

Tuesday, September 21, 2010

Mmmmm... Butternut Squash and Apple Soup... Aaaaaaaaaaauuugggghhhh!!


The nights are getting cold, that autumn scent is in the air, and it's time to start making SOUP!  Especially the creamy awesomeness of Butternut Squash and Apple Soup! When I pulled out the recipe i used last year and saw it had a lot of creme in it, I decided to research a little more, and found a couple recipes that I combined and cannibalized to make the bowl of rich delicious goodness you see on here that achieves the same warming smoothness and only adds a touch of real cream as a garnish, if desired!  Erika took some of this to work yesterday and her coworkers now want me to sell it to them!
I started with three smallish squashes
3 medium leeks
4 cloves garlic, smashed and chopped
4 peeled, cored and roughly chopped apples, the tarter the better!
2 teaspoons Toasted Spice Rub (recipe below)
2 32oz cartons of Chicken Stock
I split the squashes, cleaned out the seeds with an Ice Cream Scoop, and seasoned them with fresh ground black pepper, kosher salt and some rosemary...
Put 'em cut side down on a foil lined sheet sprayed with cooking spray...
and baked them for about 30- 40 minutes, till they looked...
like this inside.  While they cooled to a point I could deal with them...
I cut up the leeks.  I peeled the outside layer, cleaned them as best as I could, made lengthwise cuts seen here, then cut very thin slices from the end, stopping when they got green.  These three yielded about 3/4 cup chopped up.
I sauteed the leeks and the garlic in the bottom of the Stock Pot with 2 Tbsp butter, then added the cooked squash (which I scooped out of their skins), and the cut up apples.  After stirring this around for another 5 minutes...
I added the Chicken Stock.  It should be noted that this recipe could very easily go Vegan by switching the Chicken stock to veggie stock and by using Olive Oil instead of butter.  You may need to thicken the soup in that case, since the veggie stock lacks the natural gelatin in Chicken stock.   

(Please ignore the container of sesame seeds in the corner of some of these shots, it has nothing to do with this recipe.)

After this cooks at a low boil for, say, thirty minutes, remove to a large bowl...
and puree in a blender in batches, returning the puree to the pot, and heating back to a low boil before serving.
If you have a strainer, use it when returning the soup to the pot.  
I don't have one, so I didn't.
The finished soup, strained or not is sublimely delicious.  Creamy and smooth, and filled with good stuff!  The complexity of flavors from the spice rub comes through in every spoonful.
I have garnished it here with a sprinkle of nutmeg and a dash of fresh heavy cream.  If I still had any of my Creme Fraiche, that would have worked perfectly, as would a dollop of sour cream, or a handful of candied walnuts!
This is a bowl of squash that even Homer Simpson would drool over!

Toasted Spice Rub (courtesy Foodnetwork.com, Michael Chiarello):
I didn't follow Michael's blend perfectly.  Here is mine.
1/4 cup fennel seeds
1 Tbsp coriander seeds
1 Tbsp black peppercorns 
1/2 tsp red pepper flakes
1/4 cup chili powder
1 tsp kosher salt
2 Tbsp ground cinnamon
Toast the first three ingredients in a small heavy pan over medium heat.  When brown, and stirring constantly, turn off the heat and stir in the pepper flakes.  Cool on a plate, then put in a blender with the chili powder, salt and cinnamon and blend until evenly ground.

Shrimp and Bay Scallop Linguine for Loser Friday!

Friday night used to be all about going out to see live music for me and my friends.  I am now in a band, and play out on one or two weekends a month, and as life goes on and we get old (er), when Friday night rolls around, the energy to go to a crowded club just isn't always there. Sometimes you just have to blow it all off and stay home on the couch and watch TV... like a loser.  Hence, "Loser Friday".  Last Friday, Erika studied for about 10 -12 hours for a major test, that if she passes (meaning, if she gets 93% correct) means she doesn't have to take an extra, very expensive graduate course.  She was, understandably stressed, and when I asked her what I could prepare for dinner that would make her feel better, she simply told me, "something comforting".  So with tears in my eyes, I headed of to the gym for my swim, and to get out of there and leave her alone.  While swimming laps, as is my custom, I thought about food.  It would be too late to make the all time go-to comfort food, my spaghetti and meatballs, by the time I got home.  So I came up with seafood and pasta.  Simple, yes I know, but success in this venture has always just eluded me.  When I got to the supermarket, I saw that both the Jumbo Shrimp, and the Bay Scallops were on sale, and the die was cast.
To the left are my prepped ingredients, all ready to go like on the TV shows.  My "Mise En Place", if you will.  You want to do this for a dish like this because you will not have time to prep ingredients as you go.  
Top from left: Whole Wheat Linguine; Fresh ground Pepper; Kosher Salt; 1 cup White Wine (sweet this time, a Moscato) Middle Row: Smashed and chopped garlic (1.5 Tbsp); 12 Jumbo Shrimp (deveined, peeled); 1/2# Bay Scallops; 2 Tbsp fresh Thyme leaves (pulled from the stems); 1/4 cup chopped Italian Parsley
Bottom Row: Two slices thick cut bacon, cut into 1/2 wide slices; 1.5 cups  diced, seeded, salt-sweated, rinsed and dried Tomatoes (very important not to add a lot of liquid with the tomatoes); Two Shallots minced; about 2/3 cup homemade Creme Fraiche.  
 I started by cooking the Shallots in 2 Tbsp butter, then adding the bacon.  I had intended to cook the bacon first and drain it, but forgot to pull it from the fridge first!  (So much for Mise En Place!!)
When the bacon and shallots were near finished, I added the rest of the aromatics (the garlic and fresh herbs).
Then I added the seafood, making sure that all pieces were separated and cooking properly.
When the seafood was half cooked, I added the tomatoes...
followed by the wine.  You want to add the wine early enough to burn out the alcohol without overcooking the Shrimp.  If I was more dramatic, I could have burned the alcohol off, I suppose.
A minute later, with the wine cooking off and the tomatoes cooking down, almost ready...
for the Creme Fraiche.  My first batch of homemade Creme Fraiche turned out a little thin, and when I stirred it in I realized that between the wine, tomatoes and thin Creme Fraiche, the sauce was a little thin.  So working fast, I added two teaspoons corn starch to a couple ounces of water, stirred till smooth, then added to the sauce, stirring constantly.  One minute later...
...I was plating my first successful seafood pasta dish.  I didn't show the cooking of the pasta, but you pretty much drop it in the water about the same time you put the Shrimp and Scallops in the pan.
Served with some grated Parmesan Cheese, a couple glasses of the Moscato, and of course, a super-sized portion of Me, It was all the comforting Erika needed for a nice relaxing Loser Friday!
As a note, I used Moscato because it was the only white whine I had in the house at the time.  A lot of people will find it way too sweet for their palate.  I thought it worked nicely in the dish, with the tartness of the Creme Fraiche and the acidity of the tomatoes.  You may use any white wine you are partial to.

Saturday, September 18, 2010

Busy day Fish Tacos (not photographed), and a Most Righteous Tomato Pie.


Wednesday I made Tilapia Tacos, and was too busy to photograph it. I should have photographed THAT instead of the Crock Pot Surprise!  To summarize the tacos, please picture the following... 
I seasoned and broiled Tilapia  Fillets with home mixed taco seasoning (God Bless the Internet!)... made a spicy sauce with the remainder of the roasted hot peppers (from the Mango Salsa Verde I blogged about previously) with some homemade Creme Fraiche (more on the Creme Fraiche in a later blog)... served 'em up on crunchy and/or soft taco shells with split and seeded Yellow Cherry Tomatoes, chopped leftover Mango, Some shredded Napa (or Chinese) Cabbage, and shredded Taco cheese blend.  They kicked some serious *ss, although the boys were disappointed that the tacos they were promised turned out to be fish instead of ground beef or diced pork.  Owen actually liked them a lot once he tried them.  Ethan was underwhelmed, but still ate most of his fish. Success all around.  Wheee! 
This brings us to Thursday and the Tomato Pie I teased just above.
I cannot lay claim to this recipe.  I recently heard that to consider a recipe yours in the publishing world, you have to make at least three substantial changes, or omissions that change the character of the dish from the one you are inspired by.  Changing the amount, or dropping one garnishing ingedient doesn't change the overall character of this dish.  I had a counter-full of good ripe Beefsteak Tomatoes from the CSA and was getting tired of BLTs!  I found a recipe from About.com's Linda Larson, and made only a few changes due to availability and/or budgetary 
concerns.  I started with 4 tomatoes: 3 Heirloom and One Beefsteak... mainly because I didn't have 4 heirloom, Gosh are they tasty!  At this point I set my oven to 375 degrees. 
I sliced the tomatoes as you can see, sprinkled them with kosher salt, and placed them on paper towels to sweat for about ten minutes.  I will note here that this was not enough for these particular tomatoes.  the pie had a lot of extra liquid, although I was able to mop that up to no real detriment to the pie.
Look how dense the Heirloom Tomatoes are compared to the Beefsteak on the right.
My Mother always made her own crust... it wasn't that much work, was flaky rich and delicious, and was just plain cheaper. To my Mother's shame, I hung my head low as I rolled out Pillsbury Pie Dough into a greased 9" pan.  I would also like to say that I chose to leave the dough in it's rustic, untrimmed state as an aesthetic decision and a tribute to the natural state of the tomatoes, but the sad truth is I really just didn't want to deal with trimming and shaping it.
I sprinkled 3 tablespoons grated parmigiana cheese on the crust, and piled on the Love Apples!  I filled it past the top a little.
In a large bowl I mixed 3/4 cup light Mayonnaise, 3/4 cup shredded Taco Blend (you know... left over from the fish tacos? yeah... we're on a budget, waste not want not.). You could use 1 1/2 cups cheddar  like the original recipe called for... or not, we didn't miss it.
I Add 1/2 cup grated parmigiana, You want to add 20 chopped or chiffonaded (Love that word) basil leaves... or you could use 5 chopped almost-still-fresh basil leaves and a teaspoon dried basil like I did.

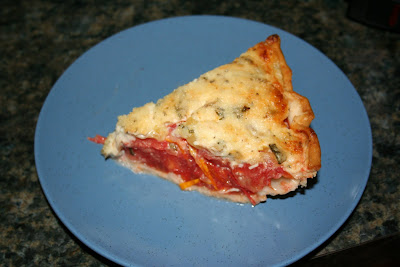
The original recipe calls for green onions but I omitted them for the obvious reason, and didn't want to go in the direction of the sweet onions I DID have in the kitchen. I mixed well and spread on top of the tomatoes... in my excitement I forgot to photograph that, so right back to the beauty shot of the beautiful tomato pie in all it's splendor, after baking at 375 for almost 40 minutes.  When the top is fully browned and the tomatoes are a-bubbling, it's done.


Notice how the pie dough in it's rustic, untrimmed state serves to pay homage to the natural state of the tomatoes.
This pie is absolutely delicious.  We had it fresh from the oven with some oven baked chicken breasts and a steamed broccoli, cauliflower blend... AND for breakfast the next morning, I had mine cold and Erika heated hers in the microwave. I come from tomato growing and canning people and I never heard of this till now.  Next time I will exert a little effort by blanching, peeling, dicing, and seeding the tomatoes, and by making a fresh homemade crust.  I might even trim it!